I know sometimes Photoshop and color correction in general can seem like magic. There’s even a magic wand in the software! And while it might take years to become an expert with the software, it doesn’t take long to learn a few simple tricks that can really enhance your photos and make you feel like an expert, even if you aren’t one.
For example, remember my cover Stronger Than Magic? The model’s eyes are quite beautiful on their own, but between the lighting and the fact that each time you touch a photo, a little integrity is lost and it’s a bit further away from reality, her eyes didn’t glisten like they do in real life. If you find that happening with your own photos, try this:
(I’m using Photoshop, but you can probably find similar tools in almost any photo editing software.)
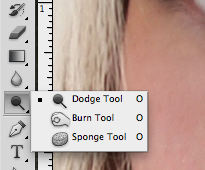
First, zoom in on the eye area so you can see what you’re doing. Next, locate the Dodge tool. It’s in the tool bar, and looks like this:
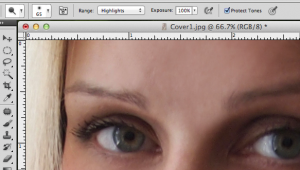
Next, check the settings which, if you left Photoshop with the default set up, will be along the top of the image. An important thing to know about the Dodge tool is it lightens anything you paint with it. If you’re lightening something, chances are you want to affect the midtones and the highlights…those lovely catch lights in her eyes which in the original look a bit washed out.
Make sure the Range is set to Highlights or Midtones, the Exposure as heavy as you like (think of it as how hard are you going to push on that paintbrush, with 100% being very very hard, and 0% being you never took the brush out of the drawer), take a deep breath, and paint on her eyeball (if your brush size is too big, right-click and you’ll get a menu that lets you change the size of the brush. Keep it just big enough to do the job, or maybe a tad smaller). You’ll notice things getting lighter. Is it too much? Hit “undo”, then change the exposure until you are happy with the results. Next, change the Range to Midtones and paint some more. I did a pass with both until I had a nice, bright eye.
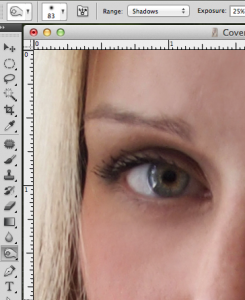
Next, select the Burn tool, which is located under the same menu as the Dodge (see above image, it looks like a hand). When you are Burning something, you’re making it darker, as the name implies. It will only act on the range of tones you select, however. Therefore, if we set the Range to Shadows, it only makes the darker tones darker, leaving the highlights and midtones alone. Go ahead, and paint over that eyeball again with the Burn tool. You’ll probably find that you need to set the Range fairly low. For this image, I used 10%. I was also selective on where I painted, and used a very small paint brush so that I only darkened exactly the areas that need it, like the pupil and the aura of the eye (the dark ring around the edge).
These two tools leave you with brighter highlights, darker shadows, and a full range of tones that, when combined on something like the eyeball, result in a dimensional, bright, shiny eye!
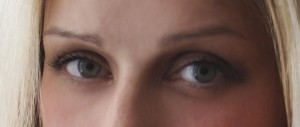
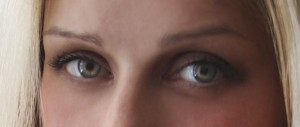
The difference is amazing, and you make it sound simple. Does this require a steady hand? I’ve found that in the past when I’ve tried to play with an image, I can’t manage to be precise enough. Or does that just mean I need to zoom in more?
Ah, yes, the key to doing anything in Photoshop is often to zoom in. If I’m doing work like this I always zoom in to at least 200%. Never zoom in at an odd amount like 65% or 125%…the monitor can’t paint the pixels properly at odd numbers. Zoom in until you can really see what you’re doing. Then choose a nice, soft brush…which basically means a brush slightly smaller than the area you’re working on, with fuzzy edges. That will negate the need to be extremely precise although there are other ways to make sure you only affect the area you’re working on and nothing else. I could keep going for days on this LOL.
Perhaps I should go over brushes next time! 😀
You totally don’t need a steady hand! That’s one of the reasons I love Photoshop, it’s almost foolproof. If you mess up, just go back a step in your history.
This is excellent, Melinda. I use pixelmator on the mac and can barely use a fraction of its features for anything productive! Thanks.
I love this, Melinda. I’ve taken Photoshop classes before, but forget most of the tricks because I don’t use it that often, but you make it super easy. The difference in her eyes is amazing. Thanks for breaking it down ~ I hope you make this a regular series.